Techcon TS250/TS350 Glue Dispensing Machine User Manual
TechconTaikang TS250/TS350 Glue Dispensing Machine User Manual
TS250/TS350DispenserSafety NoteImportant matters:
1.Do not exceed the maximum rated power when operating this device/set up
2.Be sure to wear appropriate personal protective clothing
3.Only the following power adapter models can be used:PSA15R-240P(ZJ)orPW118RA2403B01ThePW118RA2403H01ThePW118RA2403M01ThePW118RA2403G01
4.Be careful to prevent corrosive or flammable liquids from flowing back into the equipment at the entrance. If corrosive or flammable liquids are used, an intake pipe filter must be installed on the dispensing machine(881-000-000)To prevent liquid from being sucked back into the equipment
5.Glue may be toxic and/Or hazardous substances. Please carefully read the "Material Safety Data Sheet" and safety regulationsmatters needing attention
6.If the piston is not used in conjunction with the syringe, an intake pipe filter must be installed on the receiver head(881-000-000)To prevent liquid from being sucked back into the equipment. Do not overfill the syringe and use itSide placement
7.Do not smoke or use open flames when dispensing flammable liquids
8.This device can only be used indoors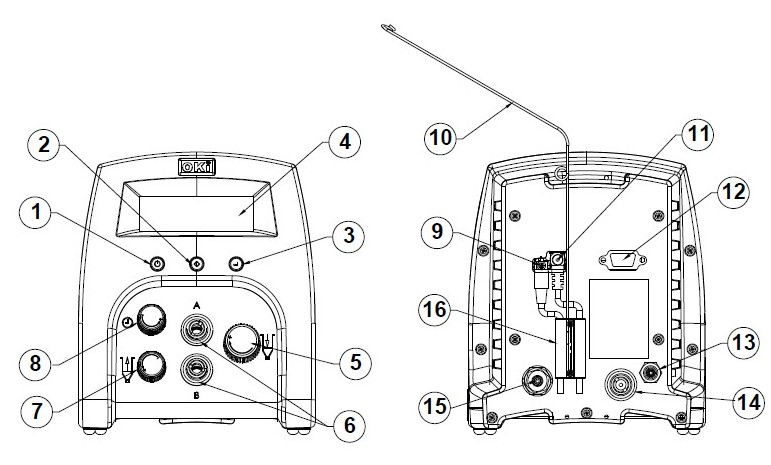
6.1 Manual/Glue dispensing cycle setting:
1. Press the 'Power' button(1)Open the device.
2. Press the 'Mode' button(2)Until it appears on the monitor“PURGERemove the glue.
3. By rotating the pressure adjustment knob(5)Until the required dispensing pressure is displayed
4. After filling the syringe or using pre packaged adhesive, attach the syringe to the receiver head assembly. Ensure that the syringe is fixed in the appropriate position.
5. Connect the insertion end of the receiver head assembly to one of the pneumatic dispensing outlets(6).
6. If vacuum suction is required, rotate the vacuum pressure knob counterclockwise(7)The required vacuum pressure can be displayed.
7. Press the foot switch to activate the dispensing cycle. (Manually at this moment)/The glue dispensing mode is activated
6.2 Automatic dispensing cycle setting
6.2.1Program selection
1.Press the settings button(3)Until“P:”Start flashing
2.Rotate program selection button(8)Select the required program
6.2.2time setting
1.Press the mode button(2)Select the desired time mode
2.Press and release the settings button(3)Until time(:)Start flashing.
3.Rotate the time knob(8)Select the required dispensing time
4.Press the foot pedal switch to start the dispensing cycle
6.3 Training mode setting
In training mode, as long as the foot switch is pressed down, the device will accumulate time. This helps determine the necessary dispensing time when the dispensing output is unknown.
1. Press the mode button(2)Select training mode.
2. Press and release the settings button(3)Until the dispensing time= 0.000S
3. Press the 'foot pedal' switch. During this operation, the dispensing time will accumulate continuously.
4. When the dispensing reaches the appropriate amount, release the "foot pedal" switch.
5. Press and hold the 'Settings' button(3)continued 2 Save data in seconds.
6. Press the 'Mode' button(2)Convert to“TIMED(Continuous) mode.
7. At this moment, the dispensing machine is set to repeat this cycle.
6.4 Continuous dispensing program settings:
TS350/TS355Can store up to 10 Apply adhesive independently or continuously.
1. according to 6.2 Select the automatic dispensing time in the required program for the steps.
2. Simultaneously press the settings button(3)And the power button(1)Start a continuous dispensing program.
3. Press and hold the settings button(3)Maintaining Time2 Seconds, can save the program for continuous dispensing.
The dispensing machine now saves the continuous dispensing program.
4. Press the mode button(2)Exit the continuous dispensing program.
6.5 Cyclic counter
The cycle counter records the number of activated automatic dispensing cycles. The maximum number of cycles that can be recorded is65,535Article. This number is displayed on the LCD monitor(LCD)The bottom right corner. In order to clear the meterNumber, you can hold down the settings button at the same time(3)And mode button(2)Until the counter is“0”.
6.6 Adjust the dispensing pressure and vacuum pressure display
1. Press and release the settings button(3)until(:)Flashing on dispensing pressure and vacuum pressure
2. Rotate the time knob(8)Select the desired display value
Troubleshooting of TS250/TS350 Glue Dispensing Machine
|
fault |
Possible reasons |
Troubleshooting methods |
|
LCDNot lit up |
? Not powered on |
Check the power cord connection |
|
The system cannot start |
? The 'foot pedal' switch is not connected or the plug is not inserted correctly |
Check the connection of the foot switch |
|
The system cannot boost the pressure |
? Insufficient air pressure |
? Increase the pressure of the gas source |
|
The system cannot be evacuated |
The vacuum setting is too low |
? Increase the vacuum setting |
|
Inconsistent glue dispensing |
There are bubbles in the adhesive |
? Reduce the vacuum setting |
TS250/TS350 Glue Dispensing Machinemaintain
This dispensing machine has become increasingly sophisticated in both design and manufacturing, greatly reducing maintenance requirements. To ensure trouble free operation, please follow the following recommendations:
1. Ensure that the gas source is clean and dry.
2. Avoid reversing or placing the syringe flat, as this may cause liquid to pass through the gas pipeline and enter the internal components.
3. Avoid connecting the equipment to gases or saturated solutions with excessive humidity.
4. Avoid exceeding the pressure of the connected gas sourceTS350The prescribed100 psi(6.9 Ba) andTS355The prescribed15 psi(1.03 Ba).
5. Only use pentanol to clean the outer surface of the mainframe.
6. Wipe the LCD monitor with only soft fabric(LCD).
擊這里給我發(fā)消息")